Tuesday, 30 November 2010

Strings of Bunting

Bunting is a great sounding word, 
conjuring up visions of coloured triangles fluttering in swags!
Bunting was the name for a light woollen fabric used by the British Royal Navy 
to make ribbons and flags, back in the 17th Century. 

Today I plan to set you sailing forth with ideas to garland your home this Christmas.


Whether you have paper or cloth
sewing machine or glue
a golden thimble or too many thumbs ... 
you can make a ribbon of bunting today with these simple ideas.

1. Start with a basic shape and draw it out on a piece of paper to be your template.
Basically, cut out lots of triangles!
These are the measurements I used.


2. Easiest bunting is made with paper triangles.
Either use double sided gift wrap or go for economy like me and use IKEA gift wrap and just glue the two triangles together.
Stitch or glue the triangles to some ribbon and you are ready to fly a flag in no time.


3. I like using felt. It doesn't fray, has a warm soft feel and just looks right for winter.
I added a line of red stitching onto the felt to give a little detail, but you can miss this out if you're rushing.
To add a little extra I popped into IKEA again and used some of their inexpensive tree decorations, fixing them under the tape, as I stitched.
4. Fabrics give you so many choices of prints and colours.
I was on a mission - no time for complicated hemming and turning inside out and pressing.
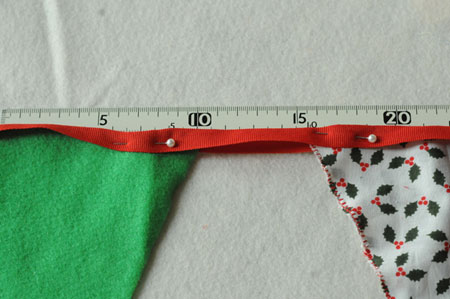
By cutting the triangles with a rotary cutter I got nice sharp edges and simply stitched a line of straight stitch down the long sides of the triangle (about 1/4inch or 1/2cm in from the edge).

5. I started to get fancy - adding white pompoms, these are intended to add a snowball effect!
See what you have lying around that could add a little detail.
But remember, "Less is more," and the bunting is hanging up high so you won't see tiny details.

6. Use ribbon, bias binding tape or cotton tape (like me).
Fold the tape double and stitch or glue it in place.
Leave at least 50cm / 2 feet of ribbon at each end, so you have something to tie it up with.
Total length is up to you.
Think of places to hang such as over a door way, on a medicine chest, round a table, round the room and plan according to the place you will hang it.

7. Be creative, branch out from your usual christmas decorations, have a little fun ...
bring some bunting into your life.


Don't forget I have a festive Giveaway for you to enter. 
I have extended the date to Friday December 3rd.
(I forgot to give you a date yesterday!)
Winner announced here on Saturday.

This is the tasty Advent package I am going to send one of my subscribers ~ 
to say "Thanks for joining me at my table".
Bunting, chocolate, gift tag pack all posted to you from China.


All you have to do to win this package is subscribe by email to this blog in the box below. 
(You need to subscribe even if you are a fabulous Google Follower to be eligible)


Enter your email address:
Delivered by FeedBurner


Monday, 29 November 2010

A Delicious Giveaway for you

I want to share a tasty Advent package today ~ to say "Thanks for joining me at my table".

The goody-pack includes a set of 8 gift cards- remember my Washi tape gift cards?
There are eight cards ready for you to use or add a little more to, a few pegs to attach them to a parcel, bakers twine and ribbon.
The delicious chocolate is for you to nibble on while you are wrapping your presents. If you need to remind yourself how good this chocolate is, see A Piece of Chocolate.


Then I thought why not add a little bit more...
No, not the Chinese medicine cabinet, but a string of Christmas bunting.


All you have to do to win this package is subscribe by email to this blog in the box below. (You need to subscribe even if you are a fabulous Google Follower to be eligible)

Enter your email address:

Delivered by FeedBurner


Tomorrow I have a Bounteous Bunting post for you. 
Come back to learn how easy it is to create some festive flags for your home.


Sunday, 28 November 2010

I wanna Pfefferkuchen .....

Looking to spice up your wintry weekend?
I have just the thing for you ~
 a delicious recipe for Lebkuchen or as I love to call them Pfefferkuchen.

I first came across these deliciously aromatic Christmas cookies
 as a teenager, in German class, at school. 
I loved the taste and I loved the name  -- Pfeffffferkuuchen
The more "ffff's" you emphasised and the longer the "uu's"...
 the better it seemed to me.
 I digress, back to baking.
 Ten days ago I discovered Cathie's beautiful blog m.e.
As soon as your mouse scans the page , tiny  ++++'s fall from the words. 
It was bloglove at first sight. 
Her blogpost that day happened to be on Lebkuchen
Fate.
My eyes lit up gazing at Cathie's beautiful photographs 
and her clear recipe description, made it easy to follow. 
Images: m.e

If I lived a bit nearer to Melbourne I would be signing up for her Christmas cookie workshop. 
Instead we are doing a little baking in Beijing today - photos may follow!
Want to know more about Lebkuchen and Pfefferkuchen history? 
Go here and there.

~~~

If you want to start December in a sweet way, why not also take a look at Lottie and Doof's blog. 
They have twelve days of cookie recipes - more than enough to keep us busy baking a batch or two.
Image:LottieandDoof


 Finally, please indulge me ...
listen to the Japanese group An' Cafe.

One minute that will have you singing 'I wanna a Pfefferkuchen' too.

I wanna a Pfefferkuchen: Miku X Bou

Don't you love it?

~~~
Giveaway details tomorrow


Wouldn't it be great to have to have The Fable of the Table delivered to your mailbox?
You would never have to worry about missing a post again.(What do you mean, you weren't worried?)

I have a super Giveaway for the start of December, 
as a thank you to all the lovely people who have subscribed to my blog by email
If you want to be eligible for the prize on December 1st, join my brilliant existing subscribers and 
just click: sign up here.

Thursday, 25 November 2010

"She is too fond of books ..."

"She is too fond of books, & it has turned her brain," Louisa M Alcott
Know anyone in your family this could apply to?
There are a few in mine, not discounting myself.

 The Literary Gift Company is a place I stumbled upon whilst trying to find The Penguin Board Game to buy for our family Christmas this year. The game looks perfect for our family of book readers, competitive game players and penguin lovers. First to collect, beg, borrow or steal 6 books is the winner.

Enticed by the offer of free postage if I spent another £1.05, I clicked away and had difficulty stopping.
Here are some ideas that caught my eye and may be helpful present ideas for you too.


The Penguin Board Game.
A mug that may not be polite, but talks straight.
Tea towels guaranteed to cheer up the washing up.
A poster sized map of the literary writers of the UK, fascinating to explore.
Parcel tape that says it all.
Scrabble cufflinks, perfect for a man in your life.
A journal for witty thoughts and secrets.
Is it a book or is it a handbag?

Things to love about this site:
1. It is part of a company called Puddle Books - great name.
2. The Frequently Asked Questions page:
 Can I return an item? 
Yes
 Is Heathcliff a murderer?
Hmmm. Tricky one.
 Do you offer an express delivery service?
Yes, except for example bespoke made Scrabble cufflinks
 What is the reading order of Ian Rankin's Rebus novels?
  1. Knots and Crosses (1987)
  2. Hide and Seek (1991)
  3. Tooth and Nail (original title Wolfman) (1992)
  4. Strip Jack (1992)
  5. The Black Book (1993)
  6. Mortal Causes (1994)
  7. Let it Bleed (1996)
  8. Black and Blue (1997)
  9. The Hanging Garden (1998)
  10. Dead Souls (1999)
  11. Set in Darkness (2000)
  12. The Falls (2001)
  13. Resurrection Men (2002)
  14. A Question of Blood (2003)
  15. Fleshmarket Close (published in the USA as Fleshmarket Alley) (2004)
  16. The Naming of the Dead (2006)
  17. Exit Music (2007) 
3. The unique and unusual range of products for bookish types, with worldwide shipping.

Have fun discovering what lies in wait for you.


Wouldn't it be great to have to have The Fable delivered to your mailbox?

I have an exciting and tasty giveaway for the start of December 
as a thank you to all the lovely people who have subscribed to my blog by email
If you want to be eligible for the prize on December 1st, join my existing subscribers and 
just click: sign up here.

Thanks for the birds

Not being American, we don't celebrate Thanksgiving in our home. 
Instead I want to show gratitude for the little feathered friends we have,
 inspired by a post on a lovely Swedish blog Pippilottashus.

I love her charming idea to make a peanut garland for the birds.
Image: Pippilotta

So if you're not carving a turkey
maybe you will join me making one of these today
and hanging it in the garden ...
 in the spirit of giving and saying thanks.


Tuesday, 23 November 2010

Pavlova anyone?

This is the recipe you need if you want an easy dessert 
that will feed lots of people 
and always seems to impress.
I shamelessly knock this up whenever I am bringing dessert 
and the great thing is
 people seem to always be so happy to see it!
Ingredients are simple: eggs, sugar, whipping cream and fruit.
Takes an hour or so to bake and then you are ready to feed a crowd.


Image: Ingrid in Beijing

Image: Ingrid in Beijing
I use Delia's recipe and it never fails 
- well apart from the time the oven was broken 
and I didn't realise! 
But that hardly counts.

Have a practice now if you haven't tried it before and then you are ready for the Christmas season.

Here's how I made this version, from my head, because it is so simple:
Ingredients::
Eggs ~ 5
Sugar, fine caster sugar is best~ 10oz (250gm)
White wine vinegar ~ 1 tsp 
Cornflower ~1 tsp 
Cream that will whip ~  1 pint or about 500ml (depends on how much you like cream)
Fruit for the top ~ strawberries, kiwi fruit & bananas, raspberries, peaches... your choice
Icing sugar to dust

Method::

  • Turn oven on to 150C
  • Take a large flat baking tray, add a layer of silicone paper and spray lightly with Pam spray (or lightly oil)
  • Measure the sugar and have it ready (sift if necessary)
  • Separate the egg whites and add them to a large mixing bowl. I use my Kitchenaid here but a hand held mixer works fine. Keep the egg yolks for something else.
  • Whisk the egg whites until they have 'soft' peaks. If you are new to this, the egg whites should stay in the bowl if you turn it upside down! But don't whip beyond this otherwise they start to break down.
  • Add the sugar 1 Tablespoon at a time. Whisk in well each time before you add more. If you doing this in a tabletop mixer you don't need to stop whisking, just keep adding sugar bit by bit.
  • When all sugar is added and whisked in well, add the vinegar and cornflower. This is optional but seems to give a nice chewy/ crispy texture, but it works well without them too.
  • Spread the meringue lightly onto the baking sheet (oiled as above) and make a large circle. Make a rim - slightly higher at the edges. I take a thin skewer and whip up some of the peaks to make little points, to be a little fancy.
  • Turn the oven temp down to 140C and add the meringue in on a shelf just below oven centre.
  • Bake for one hour. 
  • After one hour, turn the oven off but leave the meringue in the oven till cool. It helps it to totally dry out. Take the meringue off the tray and carefully slide it onto a very large plate or use a serving tray, (IKEA has one that does this job well).
  • Whip the cream to be softly-stiff - too stiff and you won't be able to spread it over the top of the meringue.
  • Scatter fruit of your choice over the top and dust with icing sugar. 
  • It is best not to add the cream and fruit more than an hour before serving. The meringue itself will store happily in a container for several days at room temperature.
Footnotes::
The normal size is made with 3 egg whites and 6 oz of sugar, baked in the same way but producing a smaller Pavlova!
It is so easy 2oz of sugar per egg white- so just make it the size you want. 
My meringues are never pure white but with the cream on top they look and taste great. Any tips for keeping meringue white would be gratefully received!
Start with a smaller 3 egg white Pavlova and then you are ready to party with a big one!
Happy whisking.

Monday, 22 November 2010

I'm finding a forest!

Image: Astrid
I promised you another 'found object' tree for the wall and here it is. 
It seems a forest of wall trees is growing!
With more than a nod to her Danish roots, Astrid has created a beauty which she describes here

God Jul, by the way, is Merry Christmas in Danish and Swedish and Norwegian!

I am so excited to see how brilliant this tree looks in the skilled hands of a creative person. 
Hope you feel inspired to try one this year, as well. 
I am off to add more found-objects onto my, in comparison, threadbare effort.

By the way, Astrid is my inspiring daughter! 
Do check out her red blog 
- you never know what she will get up to next 
- I just know it will be interesting.

Sunday, 21 November 2010

Too many coming for dinner?

Do you ever struggle to have enough chairs for all the guests at your table ?

Here is an ingenious solution I found via emmas designblogg.
Make a stack of nice large books, they don't have to be on dining, but it could be fun.
Top the pile off with a nice soft cushion.
It's even adjustable for the size of your guest!
Image: IKEA.se


The above idea is one of many to be found on IKEA of Sweden's Christmas inspiration blog.
I was feeling adventurous and signed up, even though reading swedish is a bit challenging to me. We can all look at pictures, can't we?

Let me leave you with just one more idea I love, from IKEA's blog ...
Image: IKEA.se

Take some new tea towels such as Tekla or Admete
Embroider the initials of the guests who are coming to dinner.
What a nice touch and then the napkin will be a generous size too.

And you know what - they could even use it to help with the washing up after dinner is over. Well, provided they aren't  messy eaters!

Wouldn't it be great to have to have The Fable delivered to your mailbox?

I am planning a super giveaway for the start of December 
as a thank you to all the lovely people who have subscribed to my blog by email
If you want to be eligible for the prize on December 1st, join my existing subscribers and 
just click: sign up here.

Friday, 19 November 2010

Another Tree for the Wall

Image: Maree Homer via Sunday Collector

Take a look at Sunday Collector's inspiring post today.
She has been styling a wall tree made of 'found objects' too. Hers uses a larger white board which can rest on the floor and really add atmosphere to a room, without dropping one single pine needle!
I think she must have glued or double taped her eclectic collection, rather than use pins like me.
A great reason to not throw anything small out -- until you have created your own eclectic tree. I can see a tape dispenser, old envelope and tags, the only thing more to add could be a photo or two to make it personal.
Have fun this weekend and I will be back with another great version of a 'found object' tree tomorrow.

Wednesday, 17 November 2010

Time to put up the tree?

Remember this beauty?
Back in September when I discovered Jane's beautiful photo on Flickr, I had grand plans for creating a 6 foot masterpiece on my wall. Now it's November and the thought of multiple nail holes in my wall is not so appealing ( to my landlady). 

Time to come up with the reserve plan of action ... a tree for the wall that doesn't have to be permanent and does not involve many nail holes in a concrete wall ( yes the walls are made of thick concrete here in Beijing).
Possibilities
1. To create the tree on fabric, possibly cut to a tree shape. Quickly dismissed as likely to sag and difficult to hang up.
2. I thought of paper and card - not firm enough.
3. My last idea is the best so far ... use a white canvas stretched on wooden fame. Use sewing pins to attach your trinkets/ ornaments/ treasures to the canvas. Can be very inexpensive to source a plain canvas to the size you want - lots of hobby shops have them and if you have an art college nearby there will be a supplier for sure.
Mine is 12" x 20" (30cm x50cm) for no other reason than that was what I found in my cellar. Painted with white emulsion paint.
You could choose a very long one and have the canvas standing on the floor leaning against a wall if you want to go big. The possibilities are endless.


 The close up shows you how my pearl headed pins act as an extra decoration and keep the things in place. Using a green ribbon makes it easy to create the tree's outline.

I gathered buttons, pompoms, old earrings, lots of hearts and laid them on. If you use a few mini pegs you can add small photos of family or friends too. Have you spotted Alice on mine? There were a few mistakes and pins needed to be repositioned - so I advise you to lay it out first before pinning. (I admit I retouched this photo to take away the mistakes and their holes)

Once you are happy then push the pins through the canvas  and cut up small pieces of wine cork to add onto the pin-point on the backside of the canvas and avoid injuring yourself, at the same time stopping the pins from falling out.

Next year, when I am in my own house I want to do like Jane and fix it to the wall. I think a combination of some permanent tiny frames fixed to the wall and then in between the Christmas elements can be 'blu-tacked' on so they are removable.
Another idea would be to use a heart or a circle shape, which can stay on your wall all year, and again have some tiny frames that stay on the wall all year and some that get added for the Christmas season. Just remember to lay it out first before you knock nails in the wall!
 Look forward to seeing your creations. Please email me your photos and I would love to include them here - or link to your blog. 
Anything not clear ? Just let me know. Have fun putting your tree up! 

I am planning a super giveaway for the start of December 
as a thank you to all the lovely people who have subscribed to my blog by email
If you want to be eligible for the prize on December 1st, join my existing subscribers and 
You're going to like what I have got in store for you.

PS. Take a look at Kirsty's page today for lots more creative spaces.


Monday, 15 November 2010

Chasing the Sweet Things in Life

Sweet Paul is true to his word when he says he is "Chasing the sweet things in life."
The online Holiday Issue of Sweet Paul Magazine is a feast for the eyes, a treat to read and it is free for you to download. The 100 plus pages are quick to download and filled with unique and inspiring ideas for you to try out. 

Design your own gift wrap by taking your photos to a copy centre. Make a collage, enlarge them to your desired size on a colour copier, press the print button and you have one of a kind wrapping paper with a vintage feel.


More pages of ideas of how to use old photos had me searching in neglected boxes of prints to bring out and use this Christmas. Love the idea of a tree of memories, charmingly made by pegging photos of family and friends on a tree.

Fair Isle sweaters beware - I want to turn your sleeves into knitted vases and votives. They can be used now and will keep us cosy for the months to come. Only challenge will be finding sweaters that are willing to donate their arms to me.

Food styling is also a key ingredient for Sweet Paul - recipes for warm dishes and rich desserts are beautifully laid out and tempting to try.

If your mind is still in Fall/Autumn mode then you can also see Sweet Paul's Fabulous Fall edition. 
Two treats in one day. 

Sunday, 14 November 2010

A Piece of Chocolate to start your week

Chocolate ... just typing the word is enough to get me yearning for a small square! 
How about a Chocolate Library
Green & Black's ingenious  way of presenting 12 bars of their organic and orgasmic chocolate bars in a beautiful gift box to resemble books on a shelf, is a present I would love to give ... to someone who likes me enough to invite me to share!
Image:Green&Black

If it is a real book you are after,  the dazzling cover of Ultimate Chocolate Recipes makes me hope for an equally delicious array of recipes inside. Would of course be perfect paired with the Chocolate Library above!
Image: Green&Black


For the inner child in you, why not indulge yourself or your partner with an Organic Advent CalendarStill time to order and have it for the first day of Advent. You will need supreme willpower to take it one day at a time, until December 24th!
Image: Green&Black

Green and Black's story is one of a commitment to green principles and black, intense chocolate tastes -- hence the name. The site has many treasures to savour, but their suggestions for hosting a Chocolate Tasting is a page you shouldn't miss. 
What a great way to get together with friends during the winter. Any excuse to indulge the senses with the distinct aromas, textures and tastes of fine chocolate has to be a good thing. Green & Black's online guide describes what you need to get started .... good chocolate and friends the only other essentials.
Image: Green&Black

The Green & Black's Organic Ultimate Chocolate Recipes: The New Collection

Saturday, 13 November 2010

Getting a Life ...

Created on iLife '11 by Ingrid
Have you got a Mac?
Have you got a life?
Why do I start all my posts with questions this week?

Just love the new iLife '11 that I purchased last week, for all the fun it allows me editing photos. The 'Great Memories' mosaic was created so simply, using a few of the many photos I took whilst staying in Texas with Astrid and Tilly.
I love the way the collage can just be attached and sent in my email with one click -- iLife'11 works with popular email servers like MobileMe, Gmail, Yahoo! Mail, Windows Live hotmail and AOL.

Image: Apple
Take a look and see all that it offers, I feel I got my money's worth in just the last two weeks. Your weekend is going to be full of photo-fun if you load this software up.
  No, I am not on the Apple payroll - just want to share how marvellous this is ... because I like you so much.

Friday, 12 November 2010

Christmas tutorial page

Hi
Just wanted to thank so many new friends from Spain and round the world who have dropped by today to check out my Washi tape gift tags.

I added the 'How to' in my Getting ready for Christmas Page.
To make it easier for you to see what I was making, I have added my original larger photos.
Hope this makes things clearer.

Do leave a comment if you have time - any language - I can use Google Translate to help me!


Don't forget to check the other ideas from other weeks - you may be making cards too over the weekend!

Thursday, 11 November 2010

Washi tape anyone?

Week 7: Getting ready for Christmas


Are you in love with Washi tape?
Not heard of this hip Japanese tape?
Where have you been hiding?

Washi tape (I keep wanting to call it wasabi tape) is a Japanese twist on masking tape. Made from 'washi' rice paper, it has the ability to be removed easily and is handy for many things in the artsy fartsy world I try to inhabit. It is often to be seen as a torn strip attaching a polaroid photo to a random piece of wall - not only is it useful for sticking but also wrapping, decorating and writing on. See here for the delightful story of how it came out into the creative world in 2006! (It takes a minute to download, but it's worth the wait.)

Today I felt 'inspired' to start on a few gift tag ideas for the Christmas pressies. No, I haven't actually bought any yet - hence no wrapped presents in the photos -- but I rarely do things in the right order.
Guess what my colour theme is this year! Inspired by my eldest, whose love of the colour knows no bounds, I fished out card, wasabi washi tape and a few rubber stamps.


You just need a few ingredients to cook up your own unique tags to use on gifts for any occasion.
  • card - I used natural white card I had lying around
  • my two favourite rubber stamps, bought in Santa Fe and Hobby Lobby
  • red/white twine, which now seems to be called bakers twine
  • bits of origami paper
  • 4 of my treasured rolls of washi tape
  • glue, hole punch, pearl buttons and red felt

The washi tape adds a subtle accent on some tags, on others it is the only decoration - with just enough space between to write "Merry Christmas."
The subtle shading of the tape makes it fit well with most styles, and I love the way it is easy to peel off and restick as I misjudged the edge of the card several times.
Can you spot the baker's twine stuck onto the card to accent the red washi tape? Optional but adds a twist of twine.

The idea of felt gift tags appealed to me too - but I quickly realised how difficult it would be to write a message on the felt. Instead I sewed 3 sides of the felt rectangle to make an envelope of sorts -- which can hold a 'secret' card inside. Whether you choose to fold some colourful paper  or print on card -- the felt pouch will make a reusable gift tag pocket for next year too! By sewing a loop at the top I plan to thread the loop onto the string/ribbon that will tie the present up.

Have I got you interested in wasabi tape yet?
If you live in Japan, things are very easy, with many stockists to get a roll from.
The rest of us can shop at Amazon or Etsy, where there are several sellers.
A great selection is to be found at an interesting online store Papernation and dear old John Lewis, in the UK, even has some nice designs. 
Have fun making your gift tags now, so the last minute present wrapping will be much less stressful!
Lots more creative people at Kirsty's today if you have time to drop by her Creative Space.


Subscribe via email

Enter your email address:

Delivered by FeedBurner

You may also like

Related Posts Plugin for WordPress, Blogger...